Example 1: No change to existing clients, new IP network for wireless clients
Example 2: SteelConnect Gateway as new default Gateway, new IP network for wireless clients
Example 3: SteelConnect Gateway as new default Gateway, existing IP network enhanced
No change to existing clients, new IP network for wireless clients
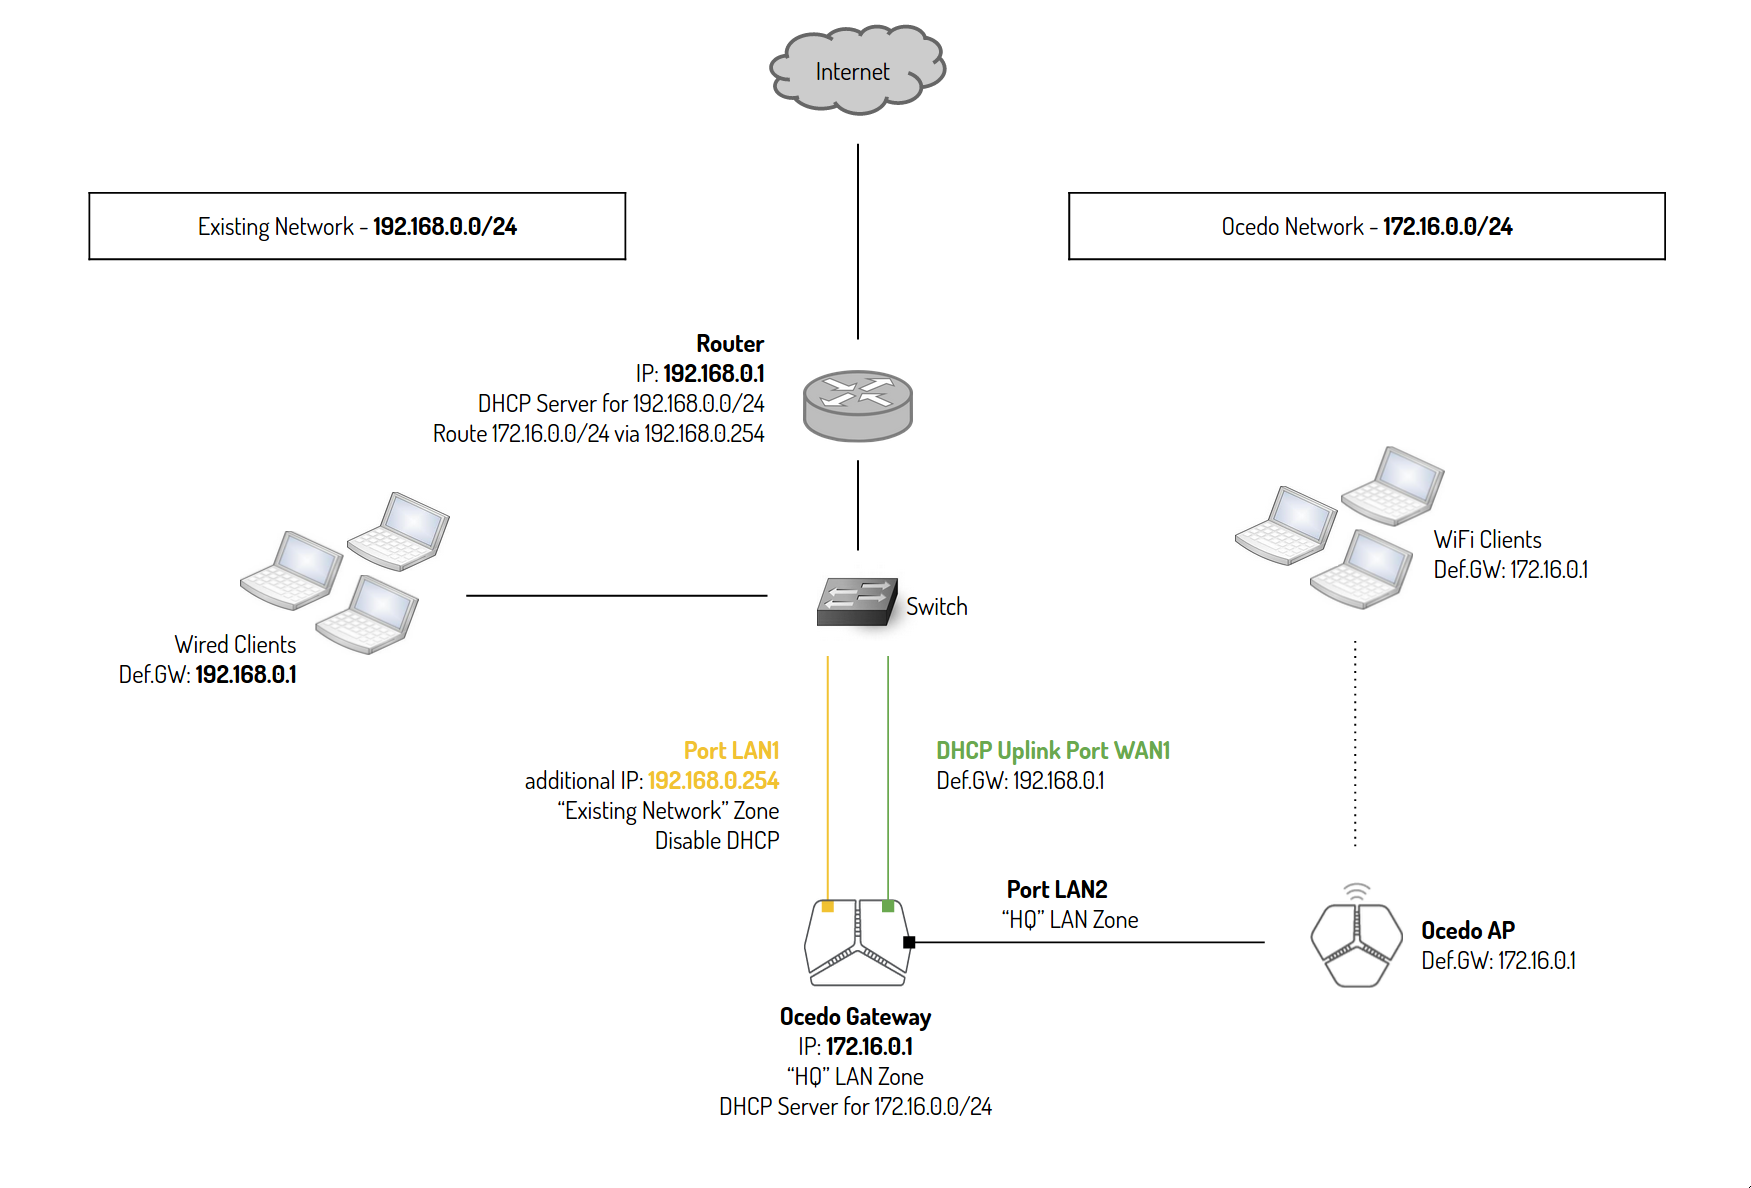
In this example we want to integrate SteelConnect products into an existing network environment.
SteelConnect’s Default HQ Zone has IP range 172.16.0.0/24 and we want to connect it with the existing network 192.168.0.0./24
The default gateway and DHCP Server for the existing network is a Router with the IP Address 192.168.0.1
We used the IP 192.168.0.254 of the existing network. Please make sure that this IP is not in the range of the DHCP Server and not used for a static IP assignment.
In addition to an unchanged HQ default configuration the following steps are necessary to implement the network scheme:
- Add a Zone into Site HQ for 192.168.0.0/24 via SteelConnect Manager > Network Design > Zones > New Zone
- select Site HQ
- Enter a name for the Zone (e.g. ExistingNetwork)
- Once the Zone is created edit the configuration
- Select Zone ExistingNetwork
- Navigate to Tab Gateways and select Manual
- Delete the Gateway assignment
- Add a new assignment with the following settings:
- Gateway appliance: select the G50
- Gateway type: Member
- IP assignment: Manual (It’s also possible the obtain an IP address from the DHCP Server of the Router)
- IPv4 Address: 192.168.0.254
- DHCP/RA Server: Off
- Inbound NAT: Off (Enable inbound NAT if you can’t create the route on your router. Point 7)
- Skip outbound NAT: Off
- navigate to Tab IP and change IPv4 Network to 192.168.0.0/24 and Gateway to 192.168.0.1
- Navigate to Ports section to configure one of the LAN ports of the SteelConnect Gateway into the Zone ExistingNetwork
- select port LAN1
- navigate to Tab Settings and select Zone ExistingNetwork
- Plug a cable into port LAN1 and connect it via the Switch to the 192.168.0.0/24 network
- Plug a cable into port WAN1 and connect it via the Switch to the Router 192.168.0.1
- Connect the SteelConnect Access Point (Ocedo Access Point) to port LAN2
- To get traffic flow between both networks add a route to the Router for 172.16.0.0/24 via 192.168.0.254
Please note that Uplink Traffic from Clients in the existing Network won’t be reported in SteelConnect’s Traffic Timeline since the default gateway is the Router and not the SteelConnect Gateway.
Make sure If autotrunking is active for the port LAN2 and on the AP if you want to broadcast the existing network with the SteelConnect Access Point.
SteelConnect Gateway as new default Gateway, new IP network for wireless clients
In this example the SteelConnect Gateway will become the new Default Gateway for the existing network 192.168.0.0/24 in the Headquarter and serves IP addresses for 192.168.0.0/24 and the new SteelConnect (Ocedo) network 172.16.0.0/24.
We used the IP 192.168.0.2 of the existing network. Please make sure that this IP is not in the range of the DHCP Server and not used for a static IP assignment.
In addition to an unchanged HQ default configuration the following steps are necessary to implement the network scheme:
- Add a Zone to Site HQ for network 192.168.0.0/24 via SteelConnect Manager > Network Design > Zones > New Zone
- Select Site HQ
- Enter a name for the Zone (e.g. ExistingNetwork)
- Once the Zone is created edit the configuration
- Select Zone ExistingNetwork
- Navigate to Tab IP and change IPv4 Network to 192.168.0.0/24 and Gateway to 192.168.0.254
- Change the existing Headquarter Uplink from DHCP to Static via SteelConnect Manager > Network Design > Uplinks
- Select HQ Uplink
- Navigate to Tab Settings and switch to Static IPv4 Type
- Address: 192.168.0.2
- Gateway: 192.168.0.1
- Navigate to Ports section to configure one of the LAN ports of the SteelConnect Gateway into Zone ExistingNetwork
- Select port LAN1
- Navigate to Tab Settings and select Zone ExistingNetwork
- Plug a cable into port LAN1 and connect it via the Switch to the 192.168.0.0/24 network
- Plug a cable into port WAN1 and connect it via the Switch to the Router 192.168.0.1
- Connect the SteelConnect Access Point to port LAN2
- Disable DHCP Server functionality on the Router for 192.168.0.0/24
Make sure If autotrunking is active for the port LAN2 and on the AP if you want to broadcast the existing network with the SteelConnect Access Point.
SteelConnect Gateway as new default Gateway, existing IP network enhanced
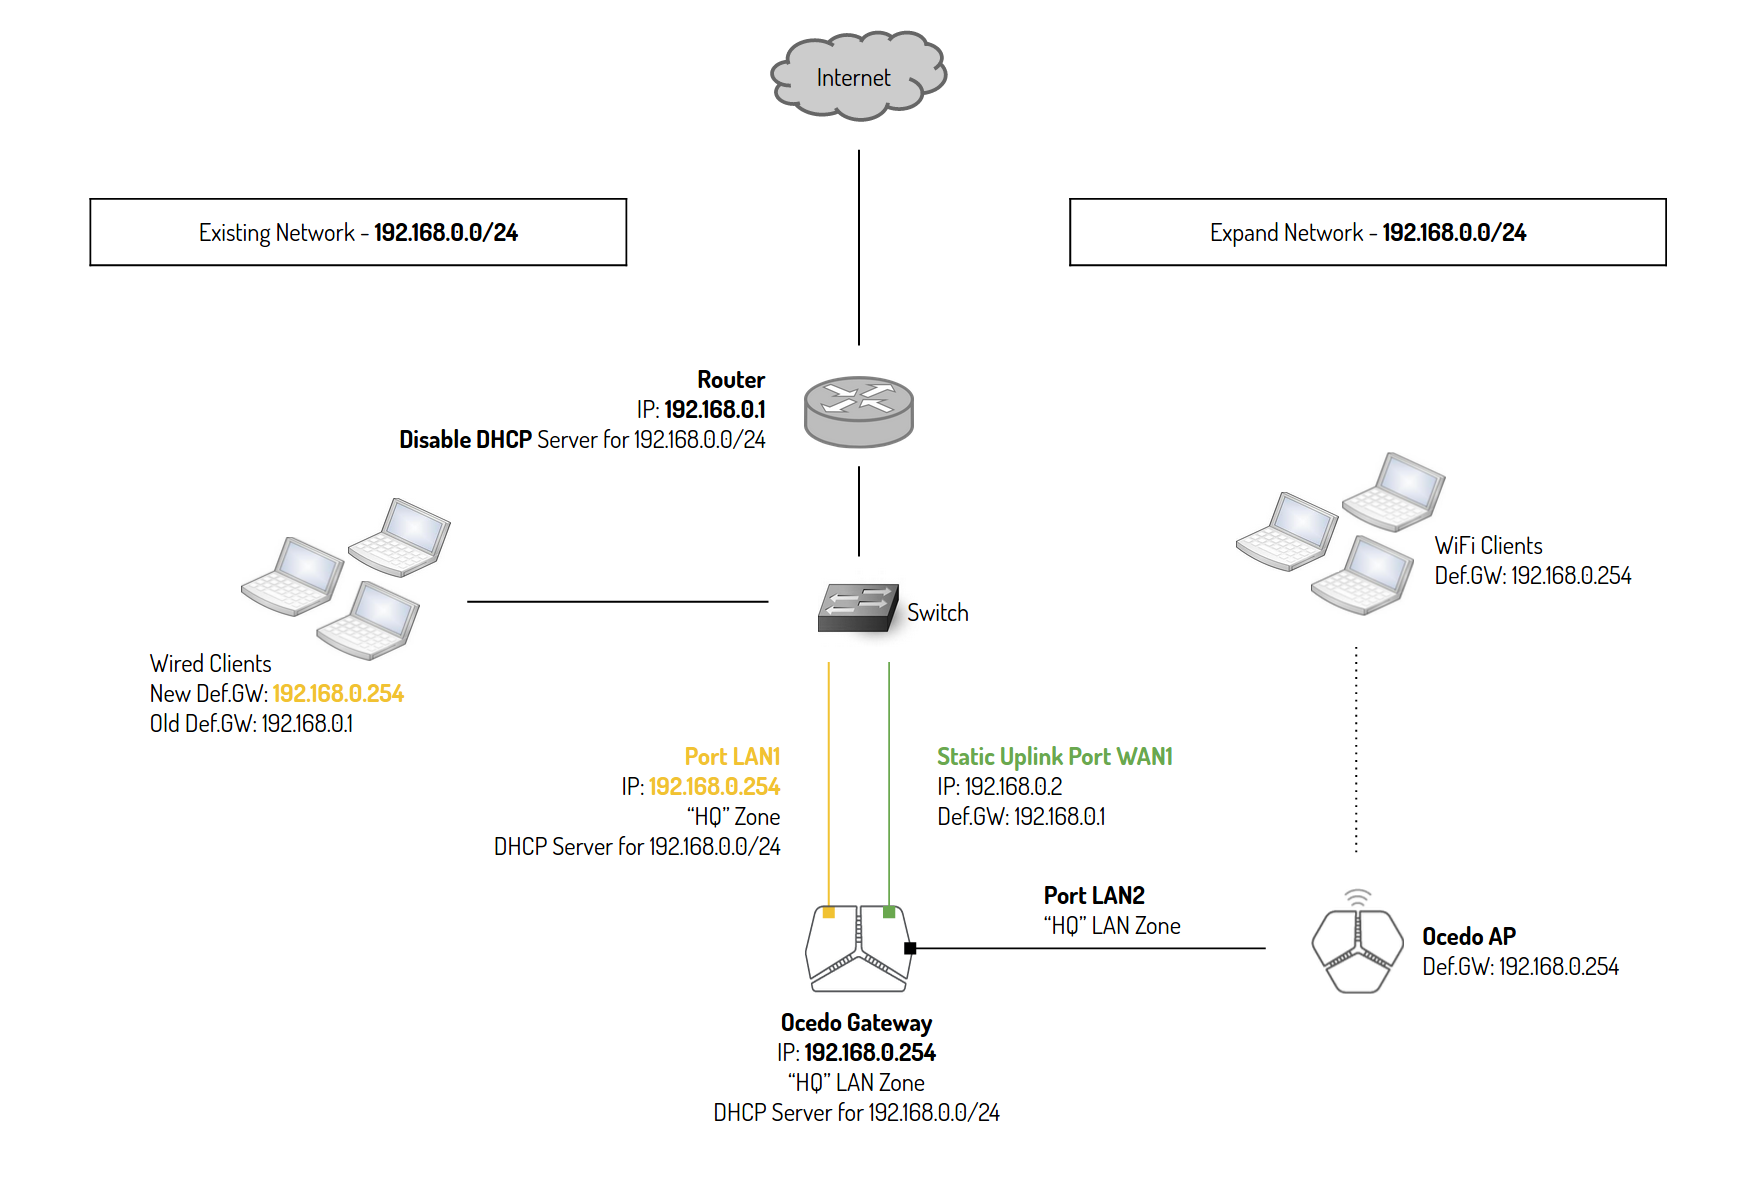
In this example the SteelConnect Gateway will become the new Default Gateway and DHCP Server for the existing network 192.168.0.0/24 in the Headquarter.
The SteelConnect Gateway is connected with two ports to the existing network. One cable is connected to the Uplink WAN Port and the other one to LAN Port.
We used the IP 192.168.0.2 of the existing network. Please make sure that this IP is not in the range of the DHCP Server and not used for a static IP assignment.
In addition to an unchanged HQ default configuration the following steps are necessary to implement the network scheme:
- Edit the HQ Zone configuration via Connect Controller > Network Design > Zones
- Select the HQ Zone
- Navigate to Tab IP and change IPv4 Network to 192.168.0.0/24 and Gateway to 192.168.0.254
- Change the existing Headquarter Uplink from DHCP to Static via SteelConnect Manager > Network Design > Uplinks
- Select the HQ Uplink
- Navigate to Tab Settings and switch to Static IPv4 Type
- Address: 192.168.0.2
- Gateway: 192.168.0.1
- Plug a cable into port LAN1 and connect it via the Switch to the 192.168.0.0/24 network
- Plug a cable into port WAN1 and connect it via the Switch to the Router 192.168.0.1
- Connect the SteelConnect Access Point to LAN2 Port
- Disable DHCP Server functionality on the Router for network 192.168.0.0/24


