
This article provides detailed steps to collect sysdump from AppResponse11 (AR11). These logs are required by Riverbed Support team for troubleshooting the product related problems.
AppResponse: How to collect initial system information on AR11 for Troubleshooting?

Issue

Solution
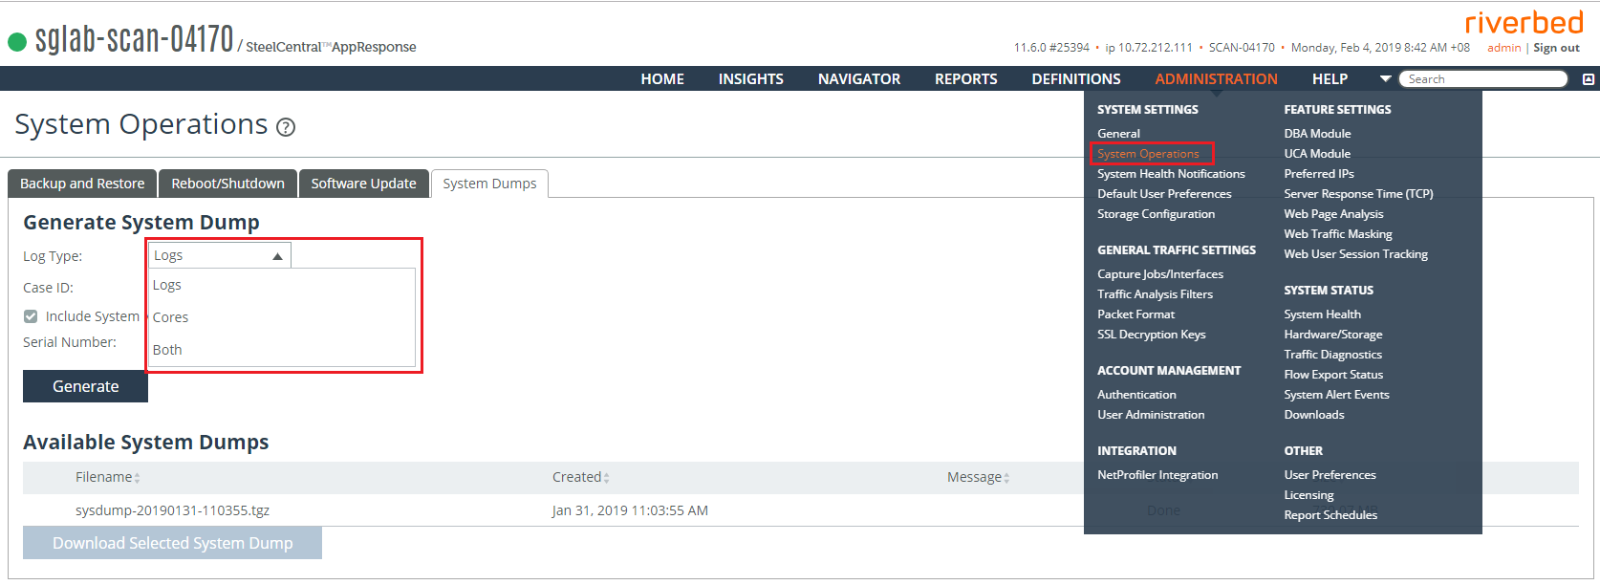
Three types of system dumps can be created and stored as a compressed file (.tgz) by an AppResponse 11 system:
- Logs - includes log files, stack traces, and some additional diagnostics as well as version information and the most recent core dump.
- Cores -includes all core dumps, versions, and all stack traces.
- Both - includes the logs and the core dumps.
- Include System Metrics(Checkbox) - includes system and process level statistics
Creating a System Dump (Web-UI)
- Go to Administration > System Settings > System Operations: System Dumps.
- Select the Log Type from the drop-down list:
– Logs
– Cores
– Both
3. Optionally, type a customer case ID if you have received one from Riverbed support. The case ID will be prepended to the sysdump filename, and will be inserted also in the file metadata so that it will be easy to recognize which customer case the sysdump is associated with.
4. The Include System Metrics option is selected by default, but you can deselect it if you wish. System metrics occupy a majority of the space used by a sysdump, up to 350 MB. You can deselect this option if you’re certain that the salient information in the sysdump is not in the system metrics.
5. Click Generate. The compressed log file is generated in the background and is listed as pending under Available System Dumps until it is completed.
Managing System Dumps (Web-UI)
System dumps that have been started are listed under Available SysDumps. The following information is provided for each dump:
• Created—the date and time the system dump was created.
• Status—The present state of the system dump.
– Pending indicates that the system dump is in progress in the background.
– Done indicates that the file is complete and ready for downloading.
• Size—The compressed file size, in bytes.
Downloading a System Dump (Web-UI)
1. Go to Administration > Other: System Dumps.
2. With the mouse, hover over the system dump to be downloaded and select the check box to the left of the Created column.
3. Click Download Selected SysDump. The compressed folder is downloaded to your local system.
Creating a System Dump (Admin CLI)
1. SSH to AR11 appliance and authenticate using admin credentials.
2. Command format to create sysdump :
Example:
sysdump create case_id <case#> log_type <both|cores|logs> system_metrics <true|false>Example:
supca-ar11-2 > en

supca-ar11-2 # conf t

supca-ar11-2 (config) # sysdump create case_id 1654321 log_type both system_metrics true
2. Command format to upload sysdump :
Example:
3. Command format to check upload status :
Example:
Refer to KB# S13970 - Uploading Files to Riverbed for more information on upload options to Riverbed support. sysdump list (Copy the sysdump ID), sysdump upload sysdump_id <ID#> uri <FTP_URL> credentials <username>:<email>Example:
supca-ar11-2 (config) # sysdump list

Sysdump_id : 47

     Status : Done

     Created : Mar 02, 2018 03:56:46 PM

     Size : 723.88 MB

supca-ar11-2 (config) # sysdump upload sysdump_id 47 uri ftp://ftp.riverbed.com/incoming/ credentials anonymous:userXYZ@domain.com

Upload_id : 1

     Sysdump_id : 47

     Status : Pending

     Started : Mar 02, 2018 04:19:14 PM
3. Command format to check upload status :
sysdump upload listExample:
supca-ar11-2 (config) # sysdump upload list

Upload id : 1

     Sysdump_id : 47

     Status : Done

     Started : Mar 02, 2018 04:19:14 PM
Environment
AppResponse11

Related Bugs

Attachments

Related Files
NOTICE: Riverbed® product names have changed. Please refer to the Product List for a complete list of product names.
Can't find an answer? Create a case